SEACHARGER
  • Home
  • About
  • Tracking
  • Gallery
  • Media
  • FAQ
  • Build Blog
  • Specifications
  • Contact

Autopilot!!!

2/2/2016

8 Comments

 
Picture
The cool thing about a project like this is that it encompasses so many different disciplines.  I'm mainly a mechanical guy, but I'm getting to learn a lot about autopilots and navigation and Arduino.

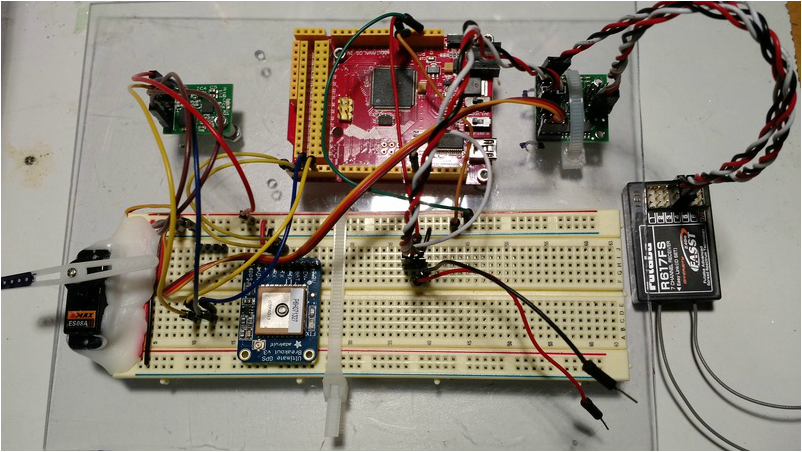
Here you see the beginnings of Seacharger's autopilot.  Clockwise from the upper left: tilt-compensated compass (Devantech CMPS-11), Seeeduino Mega (basically an Arduino Mega in a slightly smaller form factor), servo mux board from Pololu, R/C receiver, Adafruit GPS, and a servo.  Special thanks to JT for putting together all these components and getting them to talk to each other!

After reading about Arduino code and making a mockup of the autopilot in Excel, I managed to get a pretty decent autopilot working.  What I mean by this is that I could program in some waypoints and then take this setup to a local park and have it guide me to the waypoints by moving the servo arm in the direction it wanted me to walk.  There were a lot of bugs in the code, mainly having to do with passing from 359 degrees heading to 0 degrees heading or from 180 degrees to -180 degrees.  But I got all those worked out and it's all good now.  This kind of work is really fun because you can make progress so quickly.  Those software guys have it easy!
8 Comments

Better may be the enemy of good enough

2/2/2016

3 Comments

 
Picture

It's funny, in many things I'm more than happy with "good enough," but in other things I'm a perfectionist.  Well now I'm at a stage in the project where I start second-guessing some of my previous work and then redoing a lot of it.  One thing I've decided to "fix" is the propeller.  I've been using off-the-shelf model airplane propellers which are made out of fiber-reinforced nylon.  It turns out that that doesn't do too well in water.  I took one brand new propeller and dipped it in a cup of freshwater overnight and felt it in the morning.  The portion of the propeller that had been submerged was now much less stiff.  That explains why my propellers have been looking very bent after a few hours of running in water.  So what do do?  Make a carbon fiber/epoxy propeller, of course!

This actually is fairly easy if you're copying an existing propeller, like I am.  In the picture above you can see an off-the-shelf propeller that I've placed on a bed of Bondo to form the plug.  After sanding and waxing, I poured pure epoxy onto the plug.  I've never done it this way before; normally you'd use fiberglass to make the mold.  But using epoxy alone is nice because it makes the mold transparent, which then makes actually using the mold a lot easier, since you can see what the fibers and epoxy are doing inside the mold.

I would include a picture of the finished propeller but you really don't need to see it.  It looks just like the propeller above except that it's black.  Simple as that.
Picture
Other things I decided to redo were the nose cone and tail cone on the thruster.  This was probably unnecessary, and ended up being a lot of work.  But my previous nose and tail cones were pretty rough and they didn't interface with the struts on the thruster very nicely.  So I made the plugs you see in the picture above, which then got molds pulled off of them, which then got fiberglass parts pulled off of them.  Nose cone is on the left, tail cone on the right, and you can see that they each have a portion of dummy strut jutting out.  So the parts that got made from these molds have perfectly-shaped openings for the struts.  That's my son helping to brush on a layer of gel coat.
Picture
Picture
The other thing I really wanted to redo was the magnetic coupling.  It was simply too large, especially the portion that was wet.  This meant that I would be losing precious watts just from spinning the coupling itself.  So I made a smaller one.  I worked hard to design it such that it would be easy to fabricate with my limited resources.  It's made out of the 316 stainless steel screw that you see on the left, with a hole drilled down the center for the propeller shaft and a cross-hole for a set screw.  Then the other piece shown in the pictures started out as a mild steel tube, which I tapped to match the screw's thread and milled flats on for the magnets to stick to.  The mild steel acts as a "back-iron" to amplify and guide the magnetic field and has the added benefit of being easy to machine (compared to stainless steel).  I threaded this piece onto the screw, added the magnets, and then potted the whole thing in epoxy (potting not shown).  The coupling rides on a ceramic bearing.  This is the half of the coupling that will go in the water, and will probably take less than half the power to spin in the water than my old coupling.
3 Comments

    Archives

    June 2016
    May 2016
    April 2016
    February 2016
    October 2015
    September 2015
    June 2015
    May 2015
    November 2014
    October 2014
    March 2014
    December 2013

    Categories

    All

    RSS Feed